 |
| dye tests in water bath |
Color in Spinning is pretty much the guide to using professional dyes (as opposed to Kool-Aid and Rit) on natural fibers intended for handspinning. It's a fantastic resource, and has great step-by-step detail on every aspect of dyeing both protein and cellulose fibers. There are instructions for dyeing big fluffy "clouds" an even, solid color, and instructions for painting dye onto tops or rovings (which are essentially long thick "ropes" of fiber) for producing variegated yarn.
These "painted rovings" are very popular among spinners because no matter how much you love spinning, miles and miles of the same color can be very boring! The color changes in a painted roving add some variety, plus you never know quite what the finished yarn is going to be like, which also adds some excitement!
I still had the dyes from my first attempt, so I decided that now would be a good time to try this again! The first step in this process is to make color samples. Color in Spinning starts with a set of eleven colors of dye, and then gives formulas for another 56 colors that can be made with those original eleven. There is no color card, so if you want to know what those colors look like, you need to mix them up and dye them.
 |
| bits of dyed wool drying on top of my bookshelf, out of Scarlett's reach |
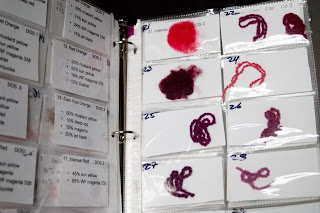
I have been working on my sample notebook. I'm using binder pages meant to hold business cards, and I put a little piece of fluff or yarn in each pocket, backed with a piece of cardstock that has the color name and formula on the other side. Each side is also labeled with the number of the dye formula as given in the book. It's really nice to be able to just flip pages and see what colors I might want to use.
I'm more than halfway through the 56 colors. Unfortunately I've run out of Sun Yellow. As you can see, the page with my yellows and oranges on it is looking a little sparse. My page of greens, sadly, is in a similar state. I am waiting for the Goddess of Fortune to smile on me (IOW - waiting for someone to buy something from me!) so that I can get more dye. In the meantime I'm going to explore painting roving with the colors I've got. I bought 5 lbs of Romney top with my Christmas money - should be enough for 20 or 30 different color experiments!


That binder notebook is a fantastic idea for keeping those in order. I know nothing about dyeing except that I read alpaca didn't take dye well but my mom bought me a lavender hank from a local spinner that smells like grape kool aid still so that must work LOL!
ReplyDeleteI'll probably be doing a lot of blog posts about my dyeing experiments, so I'm sure you'll have learned quite a bit before this particular bug bites you as well :)
ReplyDeleteKool-Aid really does work quite well, along with Wilton's cake decorating colors. A lot of people use them for playing around and for kids crafts because they're non-toxic and easy to find. However, they're not as light-fast as professional acid dyes, the colors aren't as repeatable, and although they may seem cheaper on the surface, when you compare how much fiber can be dyed with a given amount of Kool-Aid, they're much more expensive than regular acid dyes.
Still, it'd be a fun weekend/summer project to do with the boys!