Showing posts with label spinning. Show all posts

Friday, November 11, 2011

Things to do in the dark

Being without power for extended periods of time means finding things you can do in poor light.  I can spin pretty well in the dark, and I don't usually have to look too hard at my knitting if it isn't something too complicated.  Unfortunately the knitting project I was working on when the power went out was these:

Not really something I could work on in the dark!  I managed to finish them the day after the power came back on.
I really needed something completely mindless, so I decided to knit swatches! I had two full-sized skeins and two samples in different colorways.  I decided a while ago that I wanted to post photos of knitted sample in my Fiberarts Etsy, because there's so often such a big difference in what a multicolored yarn looks like in the skein and how it knits up.  How many times have you had a multicolored yarn that you loved in the skein, but that you really just didn't like in the knitted object?  

The same thing happens in reverse all the time - you see some knitting with colors that you love, then see the yarn it was knitted with, and think "I would never have pictured this yarn coming out like that!"

Spinners experience this all the time.  See how bright and almost garish the different colors look in the unspun wool?  The colors become much less intense in the finished yarn because of the the blending that occurs during spinning.  Because of this blending, it can be hard to see from the yarn that it will create subtle stripes when it's knitted up.

The striping is more prominent in the first example because I used colors with strong contrast. In this second example the colors are much more closely related, both in hue and value.  Here, you don't get strong stripes so much as a subtle shading.

Of course, the final effect will always depend on the size of your knitting.  Smaller projects like socks will end up with much wider and more prominent stripes.  Sweaters and shawls will have narrower stripes - sometimes maybe only one row before the color changes enough to be noticeable!  Still, it's always nice to at least have a ballpark idea of what a yarn is going to do before you plan your project.

Friday, October 28, 2011

Back to More Important Things!

Now that I'm done whining about having to replace my computer I can get back to the fun stuff!   I was very, very lucky recently.  A good friend decided to "invest" in my business(es) and gave me enough money to really start to get some things off the ground.  I'll be able to start a wholesale account with a fiber supplier, so that I can buy my wool at wholesale prices, which will give me a broader selection and a slightly higher profit margin.  After waiting forever for Etsy to come through with the promised ability to manage more than one shop from the same account, I finally just went ahead and started a second Etsy account to sell the yarn and spinning fiber in.  I'm not putting the link out there yet because the shop is still empty.  Writing up Etsy listings is more like writing ad copy than a classified, and that's never come easily to me, so the listings are going through lots of revisions before I make them public.  I'm hoping to have the new shop up and running by Thanksgiving!

Here's what I've been working on:

 I'm starting to work on colorways outside of single color families - these are some of my more successful attempts. 
 I'm also working on increasing my spinning speed.  I expect the dyed fiber to be a bigger percentage of sales, but since much of what I spin ends up sitting around waiting for a project, it may as well be available for purchase while it's waiting!

These first two colorways came out beautifully the first time!  I love it when things work right!


This last skein is just for me :)  It'll go nicely with this yarn.  Right now I'm thinking of hats and leg warmers, because this yarn is too "soft" for socks.  It would pill terribly, and I'd probably get holes faster than I'd like.
 
Not terribly fashionable perhaps, but I'm planning on wearing them under skirts with the actual aim of keeping my legs warm! 

Tuesday, September 6, 2011

A different kind of dyeing experiment

Having spent the bulk of the summer working on painted roving, I decided to try a different method for achieving Color in Yarn.  Painted rovings are fun to spin, and they can be a lot of fun to knit with, but solids are nice as well.  Plus, I have a lot of raw fleece that I can't process into roving at home, and I need to find something to do with it.

Rather than mix my chosen color and then dye the wool, I decided to dye the wool in the individual base colors I use, then blend them together in the proportions called for in that color formula.  Say I started with 100g of fiber - if my "recipe" was 68% color A, 20% color B, and 12% color C, I'd use 68g of wool dyed in A, 20g in B and 12 in C, and blend the individual colors.  This process takes advantage of optical blending, in much the same way pointillism does.  It creates the appearance of a solid color, but with greater depth and interest, especially when seen from up close.

Here's what I did.  I weighed out the fiber for individual colors into gallon zipper freezer bags (labelled, so I would know what color went in which bag), added a solution of water and Synthropol (a surfactant to ensure the fiber wets out evenly), and let the wool sit for a couple of hours.  Then one bag at a time, I carefully removed the wool and added the appropriate  amount of dye & other chemical assists, then returned the wool to the bag.  I found it important to remove the wool before adding the dye, otherwise most of the color would end up in one spot on the wool, rather than evenly dispersed.

I then put the plastic bags full of wool/dye in a large stockpot with a rack at the bottom, and filled the stockpot with water.  I slowly heated up the water bath, monitoring the temperature with one of those nifty probe thermometers that provides a constant readout, and kept it at about 180F for about two hours, then left the bags to cool to room temperature in the water bath.

When they had cooled, I rinsed the wool and hung it to dry, then blended the separate colors on my drum carder.

It spins up into a wonderfully lofty DK/Worsted weight 2ply!  I'm very pleased with the results!  One of the things I like about this process is that it allows me to turn what would normally be a flaw into a "design element."  This particular fleece is fairly fine, and despite my best handling is prone to neps.  These little clumps of fiber are generally considered undesirable in an undyed or solid colored yarn, but when the colors are dyed before being blended, the neps make nice little flecks of color in the finished yarn that I find I rather like!

My next question in this process:  Do I card the wool before or after the dyebath?  If I dye before, the fiber gets a little compacted by the process, and I need one or two more passes through the carder than I would otherwise.  On the other hand, if I dye after, I still need to do almost as much carding, but would no longer have the choice between very thorough blending (as in the example here) or a streakier, less uniform batt.  If I wanted that effect I would have to card all the colors separately anyway, so would it really save that much time?  I'll work on that idea on my next round!

Saturday, August 13, 2011

And some more handspun yarn!

I've been spinning up my color tests at the farmer's market.  I can usually get about two 2oz rovings spun and plied in one 4-hr farmer's market.  I finally got around to taking pictures of the finished yarn.  Some I'm happy with, some need to be tweaked a bit.


This was my first shot at purple which turned out to be more of a blue-violet.  Still very nice, so I'll probably use this colorway again.


This is my second shot at purple, which is more what I was going for the first time.  This is another that I'm happy with.


 I also finally took photos of the finished yarn from the green roving I posted here.  It still reminds me of Brobee!


This last I'm still not happy with.  It's supposed to be orange, but the dark orange ended up being too brown.  There's too much contrast in the finished yarn for what I want. 


Aside from this last, I'm gotten most of my primary & secondary monochromes about where I want them - now I need to work on some multicolor rovings.  What I really need is a few undisturbed hours with a lot of light, eyedroppers, paintbrushes, my jars of dye, and some sheets of paper! I guess I won't be working on those until September when Scarlett goes back to school.  Oh well - at least it'll be cooler by then!

Saturday, February 19, 2011

Second and third dyeing experiments - third time's the charm!


Here is attempt #2 at dyeing wool roving in this particular colorway.  I did kind of a no-no and changed two variables at once, But I'm pretty sure I still would've had to do #3 anyway, so no real time lost here. 

After having so much dye left over last time, I decided to try not doubling the dye-to-fiber ratio for dye painting, as recommended in Color in Spinning, and just go with the immersion dyeing ratios.  I also changed my method of applying heat for setting the dye.  In the first experiment I used the steamer technique, where you wrap your dyed roving up in a long piece of plastic wrap, then roll that "snake" up into a "snail" and place it in a steamer basket in a pot on the stove with water, and steam it for an hour at about 180F.  The tricky part here is trying to maintain the temperature.  If it goes much above 190F you can damage your fiber, and although the dye is supposed to start setting at 150F, it seems to take forever, and it's difficult to gauge the timing, so I try not to let it get below 175F. 

 I'd seen references to people setting dye in the oven instead, so I decided to try that in hopes that it would be easier to maintain a consistent temperature.  Several people had said they had good luck with an oven temp of 250F for about an hour, so that's what I tried.  What I 
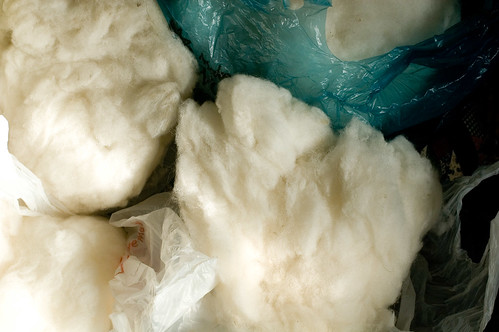
should have done was stick my thermometer in the fiber to make sure it was getting hot enough.  I was lazy, and decided to "follow the recipe."  I still had my roving wrapped in plastic wrap, then I placed it in a plastic bag before putting it in a baking dish because I didn't have a pan I wanted to dedicate to dyeing.  It was impossible to tell whether the dye had exhausted without poking holes in the plastic, which of course would result in the dye leaking out.  When I rinsed the roving I found that indeed, much of the dye had not set, and while I was getting the charcoal grey that I was looking for, the blue and the blue-green were much more muted than I'd intended.


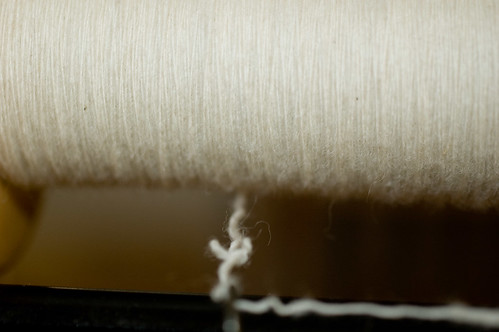
Here's the resultant yarn.  Again, very pretty, but still not what I had visualized.  I knew why I hadn't achieved the saturation in the colors that I wanted (the dye had not exhausted), but I was also disappointed that there still didn't seem to be enough distinction between the blue and the blue-green.  They were still blending too much in the roving.

In doing a little deeper research, I found that people who oven-dyed for their business tended to use oven temps closer to 300-350F.  Also, a lot of them were dispensing with plastic wrap entirely and laying their roving out in a zig-zag in a roasting pan, applying the dye, then covering the pan with tin-foil before putting it in the oven. For my third attempt, I went and got a cheap aluminum roasting pan.  When I applied my dyes, this time I made sure that the blue and the blue-green were never adjacent to each other, always having the grey between them.  I used my thermometer (the one I have has a cable that plugs into a temp readout, so I can shut it into the oven and monitor the temp from outside), and set the oven temp at 300F.  I still had to do a lot of tweaking with the temperature (turning the oven up and down, opening the oven door, etc), and left it in for a total of about an hour and a half.


Tah-dah!  This is what I was aiming for!  All the dyes exhausted, the grey has not turned black, and the blue and blue-green have not blended together - you can see that there are two distinct colors in this roving!  The roasting pan technique also took up a lot less space on my tiny counter, which, with my clumsy self, is a definite advantage!  I can see being able to fit probably two rovings per roasting pan of this size, and I should be able to fit four pans in the oven at once.  Eight at a time is not bad!


Here is the yarn from this last roving.  Still fairly subtle, still some blending in the yarn, but that's OK because that's where I want the blending to occur.  But you can see three distinct colors, not just blue and grey like the second yarn, or blue and black like the first.  It's all about control, and being able to get the results you were expecting.  I'm sure I will still get lots of unexpected results, but at least now I seem to have the biggest variables (more-or-less) under control.  Now I can start thinking up some different colorways!  I'm really glad this only took three tries - I was going to get really tired of this color combo if I didn't figure things out!

Thursday, February 3, 2011

Experiments with painted roving


 So I've started experimenting with painted roving.  Yes, technically it's not roving, it's combed top, but since "painted roving" has become the generic term for this product regardless of whether it's actual roving or top, that's how I'll refer to it.   It's very pretty, but not quite what I was going for.

In dyeing, the intensity/darkness of your final product is determined by a ratio of dye to fiber, by weight.  If you want a lighter color you use less dye, if you want a darker color you use more.  Sounds logical and reasonable, right?  This relative intensity of color is referred to as Depth Of Shade, and is generally abbreviated as DOS.  If you want consistency and repeatable color (e.g. professionals and perfectionists), you will not just toss everything in a pot and see what comes out - at least not without keeping very careful notes! 

If you want consistency and repeatable color you will use a formula to tell you what ratio of dye to fiber will give you a certain DOS.  The current dyer's standard (as far as I can tell) is to use a scale that generally starts with DOS .25 (very pale) and ends at DOS 4 (as dark as it's possible to get for that color).  In immersion dyeing, where you are dyeing everything one solid color, if you want DOS 1 you use a 1:1 ratio of dye to fiber.  A DOS .25 would be .25:1 dye to fiber, etc.  You then add enough water for the fiber to move freely and "cook" everything at the appropriate temperature until all the dye in the water has been absorbed by the fiber.


With dye painting it's a little different.  You have individual cups of dye that you apply directly to the fiber.  You place the color exactly where you want it, and have some degree of control over how much the colors blend where they meet.  There is also an optimum amount of liquid that can be applied to roving for dyeing. If you use too much, everything blends together a lot more and you have less control.  Too little, and you end up with undyed spots where you don't want them.

According to Deb Menz, when you are doing painted roving, you should use double the amount of dye to get the desired DOS.  I'm not sure why or how this is necessary, or how much of it is just "fudge factor."  I wanted the test roving at the top of the page to be a medium grey, a medium navy, and a dark forest green.  Even though I know I did all the math correctly, I ended up with way too much liquid!  While she provides good Three Bears examples (too much, too little, just right), she doesn't say "You may not need all the dye you have mixed to achieve this."  By the time I had applied the blue, the green, and half of what was supposed to be dark grey, my roving was sopping.  I stopped adding dye because I knew this was way too much, and decided to see what I would get with what I had.

What I got is at the top of the page.  The grey is still black (not dilute enough), the blue is darker than I was expecting, and they both have pretty much swallowed up the green.  Obviously I had more dye than I really needed, and I can't afford to rinse color down the drain for the sake of "fudge factor."  I will try this again with some modifications, and we'll see what happens!

That said - it still made very pretty yarn!

Tuesday, February 1, 2011

"Dyeing" to figure this out

dye tests in water bath
Several years ago when Color in Spinning by Deb Menz came out, I dipped a toe in dyeing.  It didn't stay dipped very long - I was still working full-time, and this was also after Scarlett was born, so time and sleep were at a premium.  This is one of the projects I let go.

Color in Spinning is pretty much the guide to using professional dyes (as opposed to Kool-Aid and Rit) on natural fibers intended for handspinning.  It's a fantastic resource, and has great step-by-step detail on every aspect of dyeing both protein and cellulose fibers.  There are instructions for dyeing big fluffy "clouds" an even, solid color, and instructions for painting dye onto tops or rovings (which are essentially long thick "ropes" of fiber) for producing variegated yarn.

These "painted rovings" are very popular among spinners because no matter how much you love spinning, miles and miles of the same color can be very boring!  The color changes in a painted roving add some variety, plus you never know quite what the finished yarn is going to be like, which also adds some excitement!

I still had the dyes from my first attempt, so I decided that now would be a good time to try this again!  The first step in this process is to make color samples.  Color in Spinning starts with a set of eleven colors of dye, and then gives formulas for another 56 colors that can be made with those original eleven.  There is no color card, so if you want to know what those colors look like, you need to mix them up and dye them.

bits of dyed wool drying on top of my bookshelf, out of Scarlett's reach
I decided that 10 grams of wool was a good sample size (nice and easy to measure), but at that relatively small weight, I would need to measure certain chemicals used in the process in fractions of grams.  I knew that this was my downfall the first time around.  At the time I only had a triple-beam balance scale.  While it was incredibly accurate, it was also extremely tedious to use, and took a lot more time than I really had.  Now I have a nifty little digital scale that has made that step so much faster and easier!

 I have been working on my sample notebook.  I'm using binder pages meant to hold business cards, and I put a little piece of fluff or yarn in each pocket, backed with a piece of cardstock that has the color name and formula on the other side. Each side is also labeled with the number of the dye formula as given in the book. It's really nice to be able to just flip pages and see what colors I might want to use.

I'm more than halfway through the 56 colors.  Unfortunately I've run out of Sun Yellow.  As you can see, the page with my yellows and oranges on it is looking a little sparse.  My page of greens, sadly, is in a similar state.  I am waiting for the Goddess of Fortune to smile on me (IOW - waiting for someone to buy something from me!) so that I can get more dye.  In the meantime I'm going to explore painting roving with the colors I've got.  I bought 5 lbs of Romney top with my Christmas money - should be enough for 20 or 30 different color experiments!

Sunday, January 17, 2010

Why I stopped knitting


I had mostly stopped knitting (and spinning!) about 7 years ago when I came down with an acute case of Bouncy Toddler.  My daughter had a tendency to treat Mommy and all of her stuff as a jungle gym/trampoline, with no regard whatsoever for what I had in my lap, or what might happen to it (or her) if she landed on it.  All pointy sticks were packed away, and rarely saw daylight.  Because I worked nights, there really was no time that I could knit safely - what little free time I had needed to be spent on other things. 

Unfortunately, she never really progressed past the Bouncy Toddler phase.  She was diagnosed with autism at 2 1/2, and has continued to jump into my lap with her typical lack of concern/understanding that there is something sharp that might do her damage.  Until she has been hurt by something, she doesn't recognize that it can hurt her.  Fortunately it only takes once, and she'll avoid that thing like the plague - but I'd rather she didn't have to learn about 2mm lace needles by experience :(  These last two years have been better, as we have found an ADHD med that reduces her tendency to Superball off all available objects.  It also makes a big difference for her in school - always a good thing!  As a result, I have been slowly rediscovering things I had to set aside those first few difficult years.  I'm glad I've been able to come back to these - I really missed spinning!


I still have a lot of unspun fiber stored away, which should keep me occupied for quite a while, as long as I don't decide I really need to make something for which none of the fiber I have at home is suitable.  I hope it will be many months before I get to that point.  I'm all in favor of The Bottomless Stash, and I understand quite well why it's necessary to have several different types of tops or roving, and at least one full fleece of every different breed one comes across.  Right now I just can't afford it - I need to spin what I've got before I can justify spending money on fiber.  I count myself lucky that most of the wool I have can be spun into a variety of different yarns, and I still have enough dye that I'm not limited to knitting with white (with the exception of one gorgeous black Navajo-Churro fleece - but that's another blog post).  I'm luckier than some - at least I already have everything I need!


So I'm still spinning my three-ply sock yarn - two bobbins down, one to go!  I finished my Cookie A. Clandestine socks and have started a pair of plain-vanilla wool socks for my son.  In the spirit of "don't buy what you can make," I've been knitting warm socks for the household instead of buying them.  I also have a growing basket of socks that need darning that I will get to one of these days.  If I can fix it, I won't replace it.  I do admit to procrastinating on the sock darning - I don't expect it to be fun! I am, however, getting some assistance with my sock knitting....


Monday, December 28, 2009

"Please account for any period of inactivity longer than 6 weeks...."


I've been neglecting my blog terribly!  I'm sorry!  December tends to be a busy month here as it is for many other households.  I cannot, however,  in good conscience put all the blame on December.  The biggest culprits have been my knitting needles, which have been mostly dormant for the past few years, but are now waking up again.  Yes, I've gotten back into my fibery pursuits!  All my activities seem to run in cycles, which is why I never get rid of craft supplies, even for things I haven't done in years.  I know (through experience!) that some day I'll get an urge to do that particular craft again, and everything will come back out! 

I'm getting to know my knitting habits better as years go by.  In fact, my knitting and handspinning preferences are quite well matched!  I prefer to spin fine yarns.  I know a lot of spinners complain about not being able to produce that irregular "beginner's" yarn after they master consistent spinning - I am not one of them!  I have come to realize that no matter how quickly chunky yarns knit up, I just don't like the look.  I also know that I will never have the patience to knit an adult-size sweater, especially in the finer yarns I prefer, so I don't even try anymore.  I really love socks!  Now that I've discovered how to knit both socks at once I no longer suffer from Second Sock Syndrome and I find that socks are the perfect portable project, and because they can be finished so quickly I get a much greater sense of accomplishment.

I have discovered that while I love color, I do not like doing colorwork in knitting.  I generally knit continental-style, but can also do English style, so fair-aisle is pretty easy (one color in each hand) - I just hate weaving all the extra ends in!  I find the need to stop and start the different colors to be a distraction - it messes with my "rhythm" while I'm knitting.  I have therefore turned to texture as my preferred design element.  Recently I've been seeing a lot of monochrome variegated yarns, many specifically meant for socks.  These are great for textured knitting patterns because the subtle variations in color add visual depth and interest but do not compete with the texture.  I cannot justify spending money on yarn when I have several pounds of wool in my house waiting to be spun.  Fortunately I also have dyes!  Sometime in January I will be dyeing sock yarn!


 I have discovered Cookie A.'s sock patterns, and am impatiently waiting for my birthday in February when I'll be able to afford a copy of her book,  Sock Innovations.  Fortunately she also has a number of patterns available for free at Knitty.com, so I will have plenty of projects to keep me busy until then.  The photo here is her Clandestine pattern, adapted to be knee socks by starting with a slightly larger needle and adding four pattern repeats for length.  Because her socks tend to have slightly different instructions for the right and left foot, I decided not to do both socks at once until I was used to how she works.  This is the finished right sock-  I started the left sock yesterday.


I have discovered that I was not the only person getting frustrated with trying to knit fine yarns with blunt-tipped needles!  I love my Addi circs, but what was meant to be a plus (smooth round tips that won't split yarn) is a real PITA when you're using size 1 needles with fingering or lace weight yarn.  I think this frustration is one of the reasons I had put knitting aside for a while.  All the various decreases in texture knitting required several tries before I could get those nice round tips under my tiny yarns!  I went looking for sharper tips, and found that KnitPicks had gotten good reviews on all my required points (small needles, sharp tips, smooth joins between needle and cable), so I ordered several pairs (2,1,1-,0) just before Christmas and am impatiently waiting their arrival.  I'm dealing with the Addi's until then, but I know these socks will be so much easier once I have sharper needles!


Finally, I have discovered Ravelry! This is Social Networking for fiber people.  No matter what you're interested in there's probably a Ravelry group for it, and if there isn't you can make one!  I haven't really started participating in the discussions yet because there's so much still to read and look at, and I always prefer to take the temperature of an online group before I start posting.  I'm going to try not to get sucked too far into it - after all, I already have enough on my plate with these socks!
Related Posts with Thumbnails