Showing posts with label handspun. Show all posts

Wednesday, February 15, 2012

So what's the deal with this handspinning thing? Part 1: Wool

I recently had a conversation with my father about my new Etsy shop, AliCat Fiberarts, where I've started selling my handspun yarn and hand dyed wool for spinning.  He was wondering about the market for such products.  He wasn't being critical - just curious.  It was one of those conversations where I need to explain something to an "outsider" - in this case not only a non-spinner, but a non-fiber person!  I'm going to attempt it again here, drawing some parallels to food and gardening, as those topics have become more mainstream.

Welsh Hill Speckled Face Sheep:  Photo by Pete Birkinshaw
Once upon a time, when most people grew most of their own food, it mattered what type of tomato you were growing or what breed of chicken you raised.  It wasn't so much a matter of Good or Bad, more of Good for this purpose and Bad for that one.  With the advent of Industrial Agriculture (among other things) that idea had largely disappeared.  Now, with the current trend toward Farmer's Markets, home gardens, and heirloom varietals, these topics are in the news, so that many non-foodies know something about them, even if it's not a personal interest.

Karakul Sheep:  Photo by Patricia Longoria, zencrafting.blogspot.com.
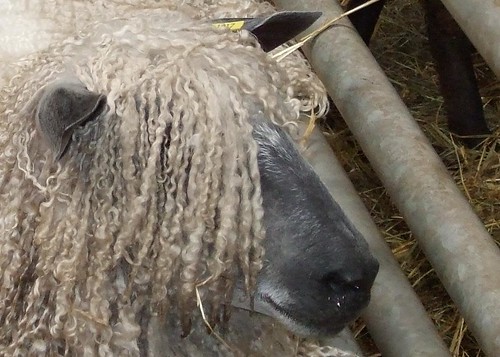
What does this have to do with spinning?  The same idea that The Variety Matters also holds true for sheep and other fiber-bearing animals.  Just as there are hundreds of varieties of tomato, there are hundreds of breeds of sheep (and yes -to the already-spinners out there - I know there's a lot of stuff to spin besides wool, but I'm leaving that for another post!).  Unfortunately, the average yarn-user's knowledge and understanding of sheep breeds has followed the same path as the supermarket produce shopper.  Aside from the "brand recognition" of Merino and Shetland (both breeds of sheep), wool is wool, right? That itchy stuff that you have to wear a heavy turtleneck under?  Well - not really -no!

Lock from Merino fleece:  Photo by Lisa Dusseault
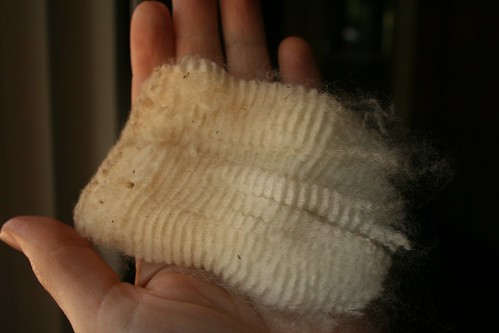
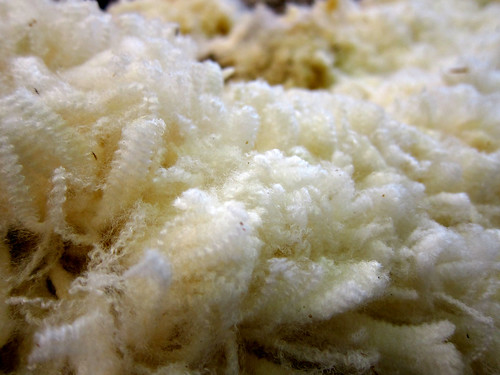
All sheep have wool, but different breeds have slightly different wool.  To vastly oversimplify things,  all sheeps' fleeces fall somewhere on a spectrum of fine to coarse, and short to long.  Fineness is based on the diameter of the fibers.  Length is the length of the fibers (usually one year's growth) - wool parlance for this is "staple length."  The finer a wool is, the softer it is.  Conversely, the coarser a wool is, the rougher and more prickly it feels, and it's this "prickle factor" that gives wool a reputation for being itchy.  Wool, from an industrial perspective, is a byproduct of the lamb industry.  With the exception of Merino and other specialty breeds, ranchers make their money off meat.  Most sheep need to be shorn annually for health reasons, and in most cases the shepherd sends all the wool to the local "wool pool" which will have fleeces from several breeds, all of varying quality, all mixed together.  This is where most generic "wool" for the textile industry comes from.  Naturally it's likely to be itchy!
Merino Ewe:  Photo by nzsheep


Merino is the Gold Standard in soft, fine wool.  Most people could wear Merino underwear and be perfectly comfortable and non-itchy.  At the other end of the spectrum there are breeds like Lincoln, which have long, coarse staples, and make excellent rug yarn - but you wouldn't want it in a turtleneck.  And here you see your tradeoff.  Merino is nice and soft and comfy - but you certainly wouldn't want to make a rug out of it.  The fine fibers that make it so soft don't stand up to that kind of wear.  You'd have holes in your rug in no time.  The nice sturdy fibers that wear like iron (the "rug wools") would be way too itchy for clothing.
Crimpy Wool:  Photo by Kara Brugman 2010

Wensleydale Sheep: Photo by Eadaoin Flynn
 Here's where we get back to the original subject.  Why spin your own yarn?  Because there are lots of sheep breeds that fall in different places all up and down this spectrum of fine-to-coarse.  Just like growing your own vegetables or sewing your own clothes, when you spin your own yarn you can tailor it to the end use in a way that's difficult to do with generic off-the-shelf wool.  Sure it's easy to find Merino yarn - that's one of the few breeds available by name.  But suppose you want to crochet a hearth rug or make potholders?  Pick a coarser longwool breed.  Knitted and felted clogs, slippers and handbags are also becoming popular - you can choose something in the middle that's not too prickly on your feet, but will still survive being walked on. Sure you can use Merino for socks - it'll be comfortable, but I hope you like darning! Pick something like Blue-faced Leicester, which is a longwool breed, but still very soft.  Once you start exploring the characteristics of different breeds it can be hard to stop!  You start giving the classic spinner's justification of "Yes I know I have ten fleeces in the closet, but I don't have that one yet!"  In the end it all becomes useful stuff.  The more we know and understand, the more useful and long-lasting our stuff will be!

Friday, November 11, 2011

Things to do in the dark

Being without power for extended periods of time means finding things you can do in poor light.  I can spin pretty well in the dark, and I don't usually have to look too hard at my knitting if it isn't something too complicated.  Unfortunately the knitting project I was working on when the power went out was these:

Not really something I could work on in the dark!  I managed to finish them the day after the power came back on.
I really needed something completely mindless, so I decided to knit swatches! I had two full-sized skeins and two samples in different colorways.  I decided a while ago that I wanted to post photos of knitted sample in my Fiberarts Etsy, because there's so often such a big difference in what a multicolored yarn looks like in the skein and how it knits up.  How many times have you had a multicolored yarn that you loved in the skein, but that you really just didn't like in the knitted object?  

The same thing happens in reverse all the time - you see some knitting with colors that you love, then see the yarn it was knitted with, and think "I would never have pictured this yarn coming out like that!"

Spinners experience this all the time.  See how bright and almost garish the different colors look in the unspun wool?  The colors become much less intense in the finished yarn because of the the blending that occurs during spinning.  Because of this blending, it can be hard to see from the yarn that it will create subtle stripes when it's knitted up.

The striping is more prominent in the first example because I used colors with strong contrast. In this second example the colors are much more closely related, both in hue and value.  Here, you don't get strong stripes so much as a subtle shading.

Of course, the final effect will always depend on the size of your knitting.  Smaller projects like socks will end up with much wider and more prominent stripes.  Sweaters and shawls will have narrower stripes - sometimes maybe only one row before the color changes enough to be noticeable!  Still, it's always nice to at least have a ballpark idea of what a yarn is going to do before you plan your project.

Friday, October 28, 2011

Back to More Important Things!

Now that I'm done whining about having to replace my computer I can get back to the fun stuff!   I was very, very lucky recently.  A good friend decided to "invest" in my business(es) and gave me enough money to really start to get some things off the ground.  I'll be able to start a wholesale account with a fiber supplier, so that I can buy my wool at wholesale prices, which will give me a broader selection and a slightly higher profit margin.  After waiting forever for Etsy to come through with the promised ability to manage more than one shop from the same account, I finally just went ahead and started a second Etsy account to sell the yarn and spinning fiber in.  I'm not putting the link out there yet because the shop is still empty.  Writing up Etsy listings is more like writing ad copy than a classified, and that's never come easily to me, so the listings are going through lots of revisions before I make them public.  I'm hoping to have the new shop up and running by Thanksgiving!

Here's what I've been working on:

 I'm starting to work on colorways outside of single color families - these are some of my more successful attempts. 
 I'm also working on increasing my spinning speed.  I expect the dyed fiber to be a bigger percentage of sales, but since much of what I spin ends up sitting around waiting for a project, it may as well be available for purchase while it's waiting!

These first two colorways came out beautifully the first time!  I love it when things work right!


This last skein is just for me :)  It'll go nicely with this yarn.  Right now I'm thinking of hats and leg warmers, because this yarn is too "soft" for socks.  It would pill terribly, and I'd probably get holes faster than I'd like.
 
Not terribly fashionable perhaps, but I'm planning on wearing them under skirts with the actual aim of keeping my legs warm! 

Tuesday, September 6, 2011

A different kind of dyeing experiment

Having spent the bulk of the summer working on painted roving, I decided to try a different method for achieving Color in Yarn.  Painted rovings are fun to spin, and they can be a lot of fun to knit with, but solids are nice as well.  Plus, I have a lot of raw fleece that I can't process into roving at home, and I need to find something to do with it.

Rather than mix my chosen color and then dye the wool, I decided to dye the wool in the individual base colors I use, then blend them together in the proportions called for in that color formula.  Say I started with 100g of fiber - if my "recipe" was 68% color A, 20% color B, and 12% color C, I'd use 68g of wool dyed in A, 20g in B and 12 in C, and blend the individual colors.  This process takes advantage of optical blending, in much the same way pointillism does.  It creates the appearance of a solid color, but with greater depth and interest, especially when seen from up close.

Here's what I did.  I weighed out the fiber for individual colors into gallon zipper freezer bags (labelled, so I would know what color went in which bag), added a solution of water and Synthropol (a surfactant to ensure the fiber wets out evenly), and let the wool sit for a couple of hours.  Then one bag at a time, I carefully removed the wool and added the appropriate  amount of dye & other chemical assists, then returned the wool to the bag.  I found it important to remove the wool before adding the dye, otherwise most of the color would end up in one spot on the wool, rather than evenly dispersed.

I then put the plastic bags full of wool/dye in a large stockpot with a rack at the bottom, and filled the stockpot with water.  I slowly heated up the water bath, monitoring the temperature with one of those nifty probe thermometers that provides a constant readout, and kept it at about 180F for about two hours, then left the bags to cool to room temperature in the water bath.

When they had cooled, I rinsed the wool and hung it to dry, then blended the separate colors on my drum carder.

It spins up into a wonderfully lofty DK/Worsted weight 2ply!  I'm very pleased with the results!  One of the things I like about this process is that it allows me to turn what would normally be a flaw into a "design element."  This particular fleece is fairly fine, and despite my best handling is prone to neps.  These little clumps of fiber are generally considered undesirable in an undyed or solid colored yarn, but when the colors are dyed before being blended, the neps make nice little flecks of color in the finished yarn that I find I rather like!

My next question in this process:  Do I card the wool before or after the dyebath?  If I dye before, the fiber gets a little compacted by the process, and I need one or two more passes through the carder than I would otherwise.  On the other hand, if I dye after, I still need to do almost as much carding, but would no longer have the choice between very thorough blending (as in the example here) or a streakier, less uniform batt.  If I wanted that effect I would have to card all the colors separately anyway, so would it really save that much time?  I'll work on that idea on my next round!

Saturday, August 13, 2011

And some more handspun yarn!

I've been spinning up my color tests at the farmer's market.  I can usually get about two 2oz rovings spun and plied in one 4-hr farmer's market.  I finally got around to taking pictures of the finished yarn.  Some I'm happy with, some need to be tweaked a bit.


This was my first shot at purple which turned out to be more of a blue-violet.  Still very nice, so I'll probably use this colorway again.


This is my second shot at purple, which is more what I was going for the first time.  This is another that I'm happy with.


 I also finally took photos of the finished yarn from the green roving I posted here.  It still reminds me of Brobee!


This last I'm still not happy with.  It's supposed to be orange, but the dark orange ended up being too brown.  There's too much contrast in the finished yarn for what I want. 


Aside from this last, I'm gotten most of my primary & secondary monochromes about where I want them - now I need to work on some multicolor rovings.  What I really need is a few undisturbed hours with a lot of light, eyedroppers, paintbrushes, my jars of dye, and some sheets of paper! I guess I won't be working on those until September when Scarlett goes back to school.  Oh well - at least it'll be cooler by then!

Friday, June 10, 2011

Some more finished yarn


These 2oz combed tops I've been using to test colorways spin up very quickly!  This is the red from the top I showed you here.  This one is a one-off - I messed up while I was mixing the dyes in such a way that I knew I'd made a mistake, but couldn't tell you exactly what I'd done wrong, so sadly, this mistake is not repeatable.

This is the yarn from the yellow top that I forgot to take a photo of.  Rather, I thought I had already taken photos of it.  I try to wait until I've got a pic of the dyed fiber before I spin it up, just for record-keeping purposes.  Oh well - I guess I'll have to take the roving photo next time I dye this colorway.


This is what the red at the top of the page was supposed to look like.  Now that the top has a photo I can spin this and see how I like the yarn.

This is my first shot at "purples," but it's turned out more blue than I wanted.  I have another version cooking right now (along with "oranges"), so I should have something less blue and more purple to show you next time.

Monday, May 30, 2011

Adding more color

It's been a while since I posted anything about my dyeing explorations, so here's what I've been up to with that:

I've gotten a pretty good handle on technique - this makes things a lot easier.  I just need to make sure that no one's going to want to use the kitchen while I'm mixing dyes, and that no one's going to want to use the oven when I'm setting them.  This can sometimes make for some tricky timing, but such is life.


I've been working on a few more colorways.  This first one was inspired by johnny-jump-ups.  I'm not entirely sure I like it.  Or rather, the finished yarn didn't turn out to be quite what I'd envisioned.  I was picturing something that was mostly yellow, splashed with blue and purple.  It took three tries to get the ratio right in the roving, but when I spun it up, the blue and purple was more evenly distributed than I wanted.

    This may call for either Navajo-plying the spun singles, or spinning the yarn first, then dyeing it.  I'll revisit this colorway idea later. 

In the meantime I'm starting to work up a basic palette of mono chromatic colorways.  I've done reds, greens, blues and yellows (although I don't have a pic of the yellow roving yet), and I have a plan for purples, but I haven't tried it yet.  I haven't had a chance to spin any of the new colors up yet, but I expect they'll be fine.


The next step is to try and come up with a palette  of browns that I like.  The existing formulae that I'm starting from give me variations of primary, secondary, and tertiary colors, and some of those are brown-ish, but none that I would truly call brown.  The trick is to be able to do this without wasting a lot of dye!  I see a future afternoon devoted to small plastic cups, eyedroppers, and sheets of paper.  When I come up with something good, you will certainly see it here!

Thursday, February 3, 2011

Experiments with painted roving


 So I've started experimenting with painted roving.  Yes, technically it's not roving, it's combed top, but since "painted roving" has become the generic term for this product regardless of whether it's actual roving or top, that's how I'll refer to it.   It's very pretty, but not quite what I was going for.

In dyeing, the intensity/darkness of your final product is determined by a ratio of dye to fiber, by weight.  If you want a lighter color you use less dye, if you want a darker color you use more.  Sounds logical and reasonable, right?  This relative intensity of color is referred to as Depth Of Shade, and is generally abbreviated as DOS.  If you want consistency and repeatable color (e.g. professionals and perfectionists), you will not just toss everything in a pot and see what comes out - at least not without keeping very careful notes! 

If you want consistency and repeatable color you will use a formula to tell you what ratio of dye to fiber will give you a certain DOS.  The current dyer's standard (as far as I can tell) is to use a scale that generally starts with DOS .25 (very pale) and ends at DOS 4 (as dark as it's possible to get for that color).  In immersion dyeing, where you are dyeing everything one solid color, if you want DOS 1 you use a 1:1 ratio of dye to fiber.  A DOS .25 would be .25:1 dye to fiber, etc.  You then add enough water for the fiber to move freely and "cook" everything at the appropriate temperature until all the dye in the water has been absorbed by the fiber.


With dye painting it's a little different.  You have individual cups of dye that you apply directly to the fiber.  You place the color exactly where you want it, and have some degree of control over how much the colors blend where they meet.  There is also an optimum amount of liquid that can be applied to roving for dyeing. If you use too much, everything blends together a lot more and you have less control.  Too little, and you end up with undyed spots where you don't want them.

According to Deb Menz, when you are doing painted roving, you should use double the amount of dye to get the desired DOS.  I'm not sure why or how this is necessary, or how much of it is just "fudge factor."  I wanted the test roving at the top of the page to be a medium grey, a medium navy, and a dark forest green.  Even though I know I did all the math correctly, I ended up with way too much liquid!  While she provides good Three Bears examples (too much, too little, just right), she doesn't say "You may not need all the dye you have mixed to achieve this."  By the time I had applied the blue, the green, and half of what was supposed to be dark grey, my roving was sopping.  I stopped adding dye because I knew this was way too much, and decided to see what I would get with what I had.

What I got is at the top of the page.  The grey is still black (not dilute enough), the blue is darker than I was expecting, and they both have pretty much swallowed up the green.  Obviously I had more dye than I really needed, and I can't afford to rinse color down the drain for the sake of "fudge factor."  I will try this again with some modifications, and we'll see what happens!

That said - it still made very pretty yarn!

Monday, January 24, 2011

Fractal Spinning and Warm Toes

This past Christmas I used some of my gift money to do something I haven't allowed myself to do in many years.  I bought some wool for spinning that had been dyed by someone else!  I bought this Bluefaced Leicester top from Woolgatherings.

I haven't bought spinning fiber (or yarn) in a very long time because I still have a ton of wool that I bought when I was working full time.  I had stopped spinning and knitting for a while (see this post), but in recent months I have been able to get back to it, as I have with my knitting.  On the plus side, I'm not likely to run out of wool any time soon, and have enough for many pairs of toasty wool socks.  The down side is that almost all of it was purchased as raw fleece, and while it was washed ages ago when I bought it, it still needs to be carded before I can spin it.


Unfortunately I have found that while I love the look and smell of a (fresh and well-skirted!) raw fleece, I am bored to tears by the carding/combing process.  This makes it difficult to spontaneously decide "I feel like spinning tonight!"  I need to spend several days carding the wool before I have enough to spin, and if I'm tired and don't feel like breaking out the carding equipment, it doesn't get done.  I've debated selling off the drum carder, but then I remember that there are some breeds of sheep that can only be acquired as unprocessed fleece.  My compromise is that in the future I'll only buy a raw fleece if it's something special I can't get commercially prepared. 

As with the rest of the world, fashions come and go within various crafts.  When I had been more actively involved, the "in" thing to do with multicolored tops like the one pictured was to Navajo-ply it to preserve the appearance of the color repeats.  This was also about the time when self-patterning "fair isle" yarns were being introduced, and people thought the idea of yarns that made stripes without having to weave in extra ends was kind of cool.

Current spinning fashion is shifting towards more subtle color changes.  In the Summer 2007 issue, Spin-Off magazine  published an article on a technique the author called "fractal spinning."  With this technique you split the spinning fiber lengthwise into strips of varied thickness, with the thicker sections providing longer color repeats than the thinner ones.  When the resultant singles are plied together you end up with the longer color repeats acting as a sort of unifying background to the shorter  color repeats, with the net effect being that the transitions between color changes in the finished piece are much softer. This was my first opportunity to try this technique.


 I decided that I wanted a 3-ply fingering-weight yarn for socks.  I split the tops into thirds, with one third left whole, and the other two split into two and three parts.  You can see the difference the splitting makes in the singles!


Here's the yarn I ended up with - a lovely, drapey light-fingering-weight 3-ply.


I chose to knit a pair of Kai-Mei socks from Cookie A.'s book  Sock Innovation: Knitting Techniques & Patterns for One-of-a-Kind Socks.  These were a breeze compared to most of her other sock patterns!  They only took me about a week and a half (not counting days I couldn't get any knitting done), and they are very warm and comfy!


As you can see, while there are definitely stripes, they have much softer edges than they would if the color transitions had been more abrupt.  I may still have projects that want defined stripes, but it's nice to be able to choose a middle ground.
Related Posts with Thumbnails