Monday, December 28, 2009

"Please account for any period of inactivity longer than 6 weeks...."


I've been neglecting my blog terribly!  I'm sorry!  December tends to be a busy month here as it is for many other households.  I cannot, however,  in good conscience put all the blame on December.  The biggest culprits have been my knitting needles, which have been mostly dormant for the past few years, but are now waking up again.  Yes, I've gotten back into my fibery pursuits!  All my activities seem to run in cycles, which is why I never get rid of craft supplies, even for things I haven't done in years.  I know (through experience!) that some day I'll get an urge to do that particular craft again, and everything will come back out! 

I'm getting to know my knitting habits better as years go by.  In fact, my knitting and handspinning preferences are quite well matched!  I prefer to spin fine yarns.  I know a lot of spinners complain about not being able to produce that irregular "beginner's" yarn after they master consistent spinning - I am not one of them!  I have come to realize that no matter how quickly chunky yarns knit up, I just don't like the look.  I also know that I will never have the patience to knit an adult-size sweater, especially in the finer yarns I prefer, so I don't even try anymore.  I really love socks!  Now that I've discovered how to knit both socks at once I no longer suffer from Second Sock Syndrome and I find that socks are the perfect portable project, and because they can be finished so quickly I get a much greater sense of accomplishment.

I have discovered that while I love color, I do not like doing colorwork in knitting.  I generally knit continental-style, but can also do English style, so fair-aisle is pretty easy (one color in each hand) - I just hate weaving all the extra ends in!  I find the need to stop and start the different colors to be a distraction - it messes with my "rhythm" while I'm knitting.  I have therefore turned to texture as my preferred design element.  Recently I've been seeing a lot of monochrome variegated yarns, many specifically meant for socks.  These are great for textured knitting patterns because the subtle variations in color add visual depth and interest but do not compete with the texture.  I cannot justify spending money on yarn when I have several pounds of wool in my house waiting to be spun.  Fortunately I also have dyes!  Sometime in January I will be dyeing sock yarn!


 I have discovered Cookie A.'s sock patterns, and am impatiently waiting for my birthday in February when I'll be able to afford a copy of her book,  Sock Innovations.  Fortunately she also has a number of patterns available for free at Knitty.com, so I will have plenty of projects to keep me busy until then.  The photo here is her Clandestine pattern, adapted to be knee socks by starting with a slightly larger needle and adding four pattern repeats for length.  Because her socks tend to have slightly different instructions for the right and left foot, I decided not to do both socks at once until I was used to how she works.  This is the finished right sock-  I started the left sock yesterday.


I have discovered that I was not the only person getting frustrated with trying to knit fine yarns with blunt-tipped needles!  I love my Addi circs, but what was meant to be a plus (smooth round tips that won't split yarn) is a real PITA when you're using size 1 needles with fingering or lace weight yarn.  I think this frustration is one of the reasons I had put knitting aside for a while.  All the various decreases in texture knitting required several tries before I could get those nice round tips under my tiny yarns!  I went looking for sharper tips, and found that KnitPicks had gotten good reviews on all my required points (small needles, sharp tips, smooth joins between needle and cable), so I ordered several pairs (2,1,1-,0) just before Christmas and am impatiently waiting their arrival.  I'm dealing with the Addi's until then, but I know these socks will be so much easier once I have sharper needles!


Finally, I have discovered Ravelry! This is Social Networking for fiber people.  No matter what you're interested in there's probably a Ravelry group for it, and if there isn't you can make one!  I haven't really started participating in the discussions yet because there's so much still to read and look at, and I always prefer to take the temperature of an online group before I start posting.  I'm going to try not to get sucked too far into it - after all, I already have enough on my plate with these socks!
Monday, November 16, 2009

Product Photography Shoots and New Work


It's been a very busy couple of weeks!  I had a custom order for a friend bumped up from a Christmas deadline to a Thanksgiving deadline (!)  and had to get cracking on that.  She and her kids had collected quartz from her grandmother's back yard and tumbled it in a hobby rock-tumbler.  One of them was heart-shaped, and I was asked to set it in something to give to her Aunt - the pendant pictured above is the result. 

Again, last week we had lots of doctor's appointments, cutting into my creative time as always.  Oh well - health is necessary!  I finally got around to taking some new product photos so that I could list my new work in my shop in time for the holiday shopping season.  I'll do another round in a few more days. 


I now have a better photo of the Paisley Pendant I was working on earlier.  I still have trouble getting any transparent stones to look right.  I need a nice neutral spotlight to shine straight forward onto the stones like in this photo setup that I really would like to have some day.  I would take photos a lot more frequently if it were easier to do!  My current lighting setup is a jury-rigged bunch of hardware-store reflectors with photo-floods and frosted Mylar for diffusion, none of which are designed to go with the stands I have for them.  It's hot, I have too much equipment crowded up in a tiny bit of floor, and I'm constantly tripping over stands and power cords!  If I could set up all the lighting more permanently it wouldn't be as big an issue, it's the setting it up and packing it up that always seem to take forever.  I'm going to make getting the new photo setup a priority for the coming year!  The more frequently I list the better the exposure I get.


I was finally able to get photos of some of my newer ring designs.  The sodalite here is a nice one.  I want to work on more rings with stones on them.  I tend not to do as many like that because anything with a stone in it will take longer and be more expensive, and I'm trying to build up a nice assortment of basic, inexpensive rings to build off of. 


Most of my stacking rings are variations on a theme, but I figure that's OK as a starting point.  I have lots of basic variations for people to choose from, and I can make them in pretty much any size, so I never have to worry about running out of something critical.

So that's what I've been doing this week!  My next project involves scanning a whole bunch of really old family photo albums so I can restore the photos and make slide-show DVDs for my in-laws for gifts! I love digital imaging, but scanning reams of photos is very tedious.  I can't wait until I'm done with the boring stuff.  I'll show you the before-and-afters when I have something to show for my effort!

Saturday, October 31, 2009

Of Socks and Stones. Alas, no sealing wax, nor cabbages and kings.

My new "rocks" arrived a good week ago, and I'm still thinking hard about what I want to use them for, other than the classic "variations on a theme."  I've been doing some of that just to keep myself in the right headspace, and I think it's starting to work.  I'm feeling glimmerings of inspiration for Monday! 


The stone in the ring on the left is a peridot, even though you probably can't tell from this shot-

I am, however, starting to regret my decision to go for a greater variety of stones of lower cost/quality over shelling out more money for larger lots of one or two stones, but with better cut.  My stone setting skills are not yet that flexible.  I have a set of stone-setting burs in a variety of sizes, but there are one or two that are missing that I think I will have to buy in order to set some of these stones.  The CZs I was setting earlier are machine-cut, and all fit perfectly.  These new stones have more size variation, and end up being just a smidge larger or smaller than the closest "matching" bur size.  Add to that my less-than-ideal setup for holding on to rings and earrings while I'm trying to set stones (sometimes it's a two-handed process) and you have a good recipe for frustration :(  


This has combined with my decision not to buy anything I can make at home, and has led to me spending more time knitting myself a new pair of socks than working in the studio.  I really need to cut that out and do my knitting after Scarlett gets home from school.  That was supposed to be the deal - I stay home and work in the studio during school hours.  Yes, socks are necessary, but I can work on those when Scarlett is home, so I should not use my precious and limited my-autistic-daughter-is-at-school hours for knitting.  On the other hand, these are going to be very nice, warm, decorative socks!


This is the "Cabled Corn " pattern from Knitting Circles Around Socks, which I love not so much for the sock patterns (which are nice), but for the two-socks-at-once technique the author uses.  I will no longer suffer from Second Sock Syndrome!  For those unfamiliar with the condition, SSS is characterized by a tendency to knit the first sock in a given pattern, then get bored with the pattern and move on to something else.   The sad result is a large number of orphan socks.  Knitting them both at once does a great deal to alleviate this situation!  These socks are being knit in a handspun wool/silk blend I had hanging around.  I have a lot of handspun hanging around - eventually most of it will turn into something.  Right now it is becoming winter socks!

Sunday, October 25, 2009

Pretty rocks!


I finally got the package of faceted stones I've been waiting for!  Now that I'm a little more comfortable with setting them I want colors!  I now have amethyst, citrine, peridot, and two different garnets (almandine and pyrope).   This week had lots of doctor's appointments and other obligations, so I didn't get to do any work in the studio until Friday :(


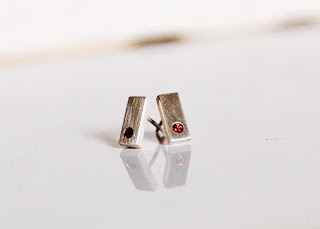
I made another pair of small rectangle posts with the 2mm almandine garnets.  I'm still playing with this design.  I like the idea, but the original pair didn't sit quite right.  I'm experimenting with the placement of the ear post.  I think if I place it a little lower on the earring, the earring will not tilt down so much when worn.  I really hope I can make it work at this size, because I love the design!  It's nice and clean, small, unobtrusive - perfect for anything casual, or for when you have very small children who like to pull on things that dangle :)

I also started work on a few more basic ring designs using the colored stones, but I probably won't finish those until Monday, so no pics yet.  DH was busy that afternoon, so no process pics :(  I am planning another big photo shoot for next week (probably Tuesday) - so I will finally have some really nice photos of the new work - not just quickie blog snapshots!  This will, of course, also mean the new work will finally be listed in my shops sometime near the end of next week - I will keep you posted!

Saturday, October 24, 2009

Pressure Cooker Chicken Stew-ish

 Another dish in my "Seat-of-my-Pants" cooking repertoire!  Not exactly stew, I suppose - not with the whole chicken legs.  Still, it's really fast and really tasty!  I end up cooking a lot of chicken this way.  DH can't eat pork or beef in any form except ground, and won't eat seafood except shrimp, so we're pretty much stuck with chicken, hamburgers and hot dogs.  I have perforce become adept at cooking chicken in many different ways.  I'm sure the nuances are completely lost on DH, as he tends to slather barbecue sauce on all his chicken no matter what I've done with it - but at least I don't have to get tired of chicken!


  • 4 red potatoes, skin on, chopped roughly into eighths
  • 2 largish carrots, peeled, sliced or chopped, whichever you prefer
  • 2 stalks of celery, sliced into roughly 1/4" slices
  • 1 large onion, sliced or chopped however you like it
  • 4 chicken leg quarters
  • 1/3c white wine
  • 1/3c stock or broth (chicken or veg)
  • 1T salt
  • 1/2t fresh ground black pepper
  • 1 1/2t Bell's Poultry Seasoning
  • 3T chopped fresh parsley

Adding vegetables to pressure cooker as you chop, saute on very low heat for about 10 min while prepping chicken.  Dredge chicken in flour and brown in a separate pan, two legs at a time.  Place chicken on top of vegetables.  Sprinkle with poultry seasoning, add broth, salt and pepper.  Seal the pressure cooker and bring to pressure (about 7min).  Cook at pressure for 10 min, turn off heat and let rest for another 10 min.  Release pressure, sprinkle with parsley, and serve with a slice of  really good bread!


Wednesday, October 14, 2009

Adventures in Handmade Laundry Soap

For the past couple of months I have been making my own cleaning products.  The more you put into something the more it costs, so if I could pare my cleaning supplies down to bare essentials it ought to cost me less than buying typical cleaning products.  I figured people were able to keep reasonably clean for hundreds of years before the invention of modern detergents - there must be a way to do this.  So far I think I'm right!  It turns out that almost everything can be made from some combination of soap or dish liquid, washing soda, borax and vinegar.  As I mentioned in my previous post about shampoo bars, I can at least feel like I'm saving money!

We ran out of laundry detergent this morning.  I found a bunch of homemade laundry soap recipes at Tipnut, and I'm going to go through them and see how they work. I'm using my handmade soap for these rather than buying bar soap (after all, that is the point) - but as long as it's bar soap and not bar detergent (like Dove), it should work. For those of you who are following along at home, I'm starting with recipe #1.

So here are two gallon Ziploc bags of grated handmade soap!  100% lard soap, just because lard is cheap, and this batch was always destined to be laundry soap, so I really didn't care about the skin-conditioning qualities.


No, I didn't use all of this!  Just 2 cups :)  I'll have plenty for experimenting with other laundry soap recipes later.

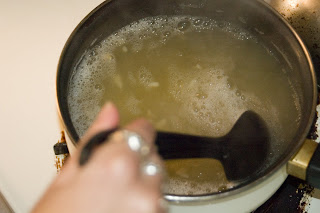
My 2c of soap gets slowly melted in 1q of simmering water in a saucepan on the stove until it's all dissolved.


The whole mess gets poured into a bucket into which I have measured 2c each of borax and washing soda (both found in the laundry products aisle of the supermarket) and mixed thoroughly until everything is dissolved.  Two gallons of water are added, and I wait for the whole thing to cool down.  I also added about a tablespoon of fragrance oil that I got for free somewhere, just because I don't really like the smell of the lard soap.  Not a spoiled smell in any way, just mildly unpleasant.  The FO isn't a scent I would have chosen, but it was free, and it's better than the lard soap, so I might as well use it.


I know - not a terribly impressive photo - but that's what it looks like now!  There's a layer of white not-foamy-anymore stuff on top that I keep mixing back in.  This will definitely be one of those "shake before use" products!  I'm going to wait until tomorrow before I try and put it in some other container for long term storage.  Some "liquid" soaps based on bar soap melted in water can turn into a sort of gloopy almost gelatinous mass, and if this laundry soap is going to do that I don't want it in some small mouthed vinegar jug that I can't pour it out of!

I now have 2+ gallons of laundry soap.  This should last us a good month, which I think is long enough to get a feel for how well it works on our clothes.  Stay tuned, and I'll let you know the results!  Oh and just for kicks, this is the photo DH took of me while I was cooking soap :)


Tuesday, October 13, 2009

Time to put the garden to bed.

Even though we haven't actually had our first frost yet, I didn't see much point in waiting.  The tomatoes this year were a lost cause.


Such a waste!  I couldn't even compost them because of the tomato blight :( 

For some reason my Japanese eggplants seem to think there's still going to be time to do something this growing season.


  I'll hold off on pulling them for a few more days, but I think I'm just going to be stuck with figuring out what to do with this one tiny eggplant.


Maybe I'll combine it with my one tiny carrot!


This is the one carrot that I got to germinate.  In July.  I pulled it up today.  I'd figured the voles would have gotten to it by now,  but apparently it was too small even for them to waste their time with!  Speaking of voles...


this is where they seem to be keeping their back door these days.  In the middle of my garden!  Next year I am going to have the unenviable task of digging down at least a foot around the perimeter of the garden and burying chicken wire so that the critters can't get in.  I am not looking forward to this :(  I hope I have enough chicken wire on hand, and I hope I will be able to talk my son into helping!  He usually enjoys anything that involves digging holes.

Now to start looking for carpet remnants and old bricks to cover the garden with until next spring.  I need to get rid of more grass - it was a bigger battle this year than I want to deal with again.  Here's to better tomatoes next year!

Wednesday, October 7, 2009

Being busy and Miso Soup :)

I was lucky enough to get three orders in over the weekend (yay!), so Monday and Tuesday were mostly spent working in the studio.  DH always tries to take pictures of me when I'm working, unfortunately sometimes what I'm doing just isn't that impressive :\


I've been working on a ton of earrings, some of which are going to be included in an Amazon promotion through my 1000 Markets shop(!), and a couple of rings.  I also have a custom piece that I'm working on for a friend, so I'm definitely keeping busy!  The rings and one pair of earrings will be shipping today, everything else should go tomorrow.  I like playing in the studio and coming up with new designs, but I like it even better when I know I'm getting paid!

All of this means I have not been able to tackle the anti-tarnish jewelry roll I've been talking about for two weeks.  Oh well.  The fabric is not going to disintegrate on me - it'll still be there waiting when I have time to deal with it.  In the meantime I can leave you with my recipe for Miso soup!


  • 3c Dashi (Japanese fish stock - if you don't have an Asian grocery near you, you can probably find this at your local natural foods store.  I'm not a purist - I'm happy with the powdered stock!)
  • 1/2-1 c sliced, chopped button bushrooms
  • 1-2T butter (or oil of your choice)
  • 3T Miso (again, available at Asian groceries or natural foods stores) White miso is milder than red miso, so if you're not sure what you're doing yet go with the white.  I like to mix them half-and-half.
  • 1-2T Wakame (dried seaweed in a plastic bag - available etc., etc.)
  • 1 or 2 scallions, whites and greens very thinly sliced. (I know it's a "garnish", but don't skip the scallions!)
Soak the wakame in a small bowl with warm water.  Use a bigger bowl than you think you need - this stuff expands dramatically!  Saute the mushrooms in the butter (or whatever you prefer for sauteing mushrooms).   Add the dashi, bring to a simmer.  Strain and add the wakame.  Adding the miso can be tricky, as it has a consistency much like peanut butter.  In Japan they have a special kitchen tool for this that is basically a strainer shaped like a small ladle.  You put the miso in the "ladle" and lower it into the soup, then you can stir and rub it against the side of the strainer so that the miso gets dissolved into the soup instead of making big lumps.  Most of us don't have one of those.  Instead, put the miso in a small bowl, add a littl of the dashi and stir until it's smooth.  Add this thinned miso to the soup.  Stir once or twice, remove from heat, and serve, garnished with the scallions!

This is so amazingly quick, and almost everything is shelf-stable or freezable (I freeze batches of sauteed mushrooms and sliced scallions) that it has become one of my "emergency meals" when I'm short on time or ingredients for anything else.  Enjoy!

Monday, October 5, 2009

Saving money and Shampoo soap!


Like almost everyone else, my family has had to seriously tighten its financial belt this year.  Being a DIYer, my answer to this dilemma has been to make as much as possible from scratch.  This kills two birds with one stone because I can (usually) spend less money on the things my family needs, and I can still fulfill my creative cravings!  For those rare instances where it's actually more expensive to make something myself, I can at least depend on whatever-it-is being of generally better quality, and that it will also make a suitable gift, saving me money in that arena.  Recipe suggestions using Bing cherries in light syrup will be greatly appreciated!

That said, I decided to try my hand at soapmaking this year.  Granted, a bar of handmade soap probably costs more than a bar of supermarket soap, but since all my costs are essentially up-front, by the time I run out of handmade soap (which will probably be years from now!) it will certainly feel like I have saved money on soap, as I will have been able to go for long periods of time without having to buy it!  And again, there's the added satisfaction of having made something from scratch, along with knowing exactly what went into it. 

While my son is not interested in helping me make soap, he loves the idea of using handmade soap, and has been asking me to make a shampoo bar.  This weekend I finally got around to it!  Very basic, unscented (I'm after practicality here, not presentation), and I hope it will last for some time!  These won't be ready to use for another 2-4 weeks, but I figure that's OK.  They'll probably be done at about the time we run out of store-bought shampoo.  Now if only I could convince my husband that people with hair that is only 1/2" long do not need conditioner!

Friday, October 2, 2009

Homemade soup + handmade bowl = perfect lunch!


I'm a big fan of soup, so this cooler weather has been a welcome change!  I'm also a big fan of making things "from scratch," so for me "soup" is never something that comes out of a red-and-white can!

This is lunch whipped up from leftovers :)  I had made chicken stock the night before, and had about a cup left that hadn't been put in the freezer yet.  I scrounged around and found about 2 tablespoons of leftover taco meat.  Yay!  Taco Soup!  I added a little garlic oil, some extra salt and pepper, and garnished it with sour cream.  Add to that the leftover end of a sourdough baguette that I got from the Cityseed Farmer's Market a few weeks ago, and I have a nice hot lunch, from scratch, that also uses up leftovers - and takes about ten minutes!

I'll admit that although I did make the bowl, I did not make it this afternoon, and it took longer than ten minutes to make :)

Thursday, October 1, 2009

It's finally looking like fall!


This is late for us!  The leaves usually start turning around the last week in August.  This year they didn't start until mid September.   Just this last week temps have mostly been in the 60's and low 70's - today's forecast is a high of 58!   I'm going to have to get my sewing machine in gear and start making my daughter new school clothes - I've discovered that most of her long pants are too small :(


My sunflowers have all done their thing, and I think I'm going to start pulling up what's left of the garden next week.  It was an awful year for gardens in the Northeast!  Between the blossom-end rot, the tomato blight, and that hailstorm we got in June I've pretty much had to give up on the tomatoes.  


Tomorrow I'll go out and collect any that are salvageable, then on Monday I'll start pulling them up and putting them in the trash.  What a waste!  I can't even compost them! 

Notes for next year's garden:
  • plant two more Japanese eggplants.  Four were good, but I still didn't end up with enough ripe fruit at once to cook with.
  • shell peas are pointless unless I can have a much bigger garden.  I will stick with snap peas.
  • be less eager to start the cucumbers - the peas will be producing longer than I think, and I can't plant the cucumbers until I pull up the peas.
  • start my flowers indoors - ignore what it says on the seed packet!
  • find a way to deal with the voles that are eating my leeks! They pull them down into their tunnels, leaving nothing above ground but a tidy hole where my veggies used to be :(
  • give the bush beans one more shot, since the hailstorm and the odd weather this year threw everything off!
  • break down and acquire some row cover so that my beet and carrot seeds don't get washed away or eaten up before they can germinate.
I'm sure I'll think of more, but these are my top priorities!  If anyone has any advice on how to deal with small rodents I'd love to hear it!


Sunday, September 27, 2009

Where all of my rings seem to end up... :)


I think it's because my fingers are a convenient place to store them!  I find that whenever I'm working on new (for me) ring styles, the prototypes always end up on my own fingers.   The downside to this is that I usually end up with rings that only stay on my index and middle fingers - its nice that stacked rings are "in"!  It is pure happpenstance that the only finger on my right hand with no rings on it is my ring finger!

I'm still working on my faceted stone setting, so two of the new rings have CZs set in them - the bead-wire ring (middle ring on index finger), and the square shank, square setting ring, which is the top ring on my little finger.  Both of these may end up staying in my personal collection!


My further adventures in earrings include this prototype pair of flowers:


This design still needs a little work.  These started with 1/2" discs of 24 ga sterling, but I think I need 26 ga instead.  I found the 24 ga to be a pain to do repousse with at this scale, and the edges of the petals didn't round off as nicely as I wanted them to.  They'll be cute when I have all the kinks ironed out of production!


In other news, I finally received the anti-tarnish fabric I'd ordered, so I can get to work designing my new jewelry storage roll next week!  I promise to take pictures and post a tutorial as soon as I can.  At my normal rate of Getting Things Done, I'd say look for it on Friday!


Thursday, September 24, 2009

Using my time wisely!

I'm afraid the anticipated photo shoot for new products is going to be put off for a while.  I'd anticipated doing it this week, but my mother has a black-tie gala for the Bridgeport Hospital Auxiliary to go to, and has borrowed my Paisley pendant to wear to the event.  This takes place on October 3rd, and I'd rather wait until I have my pendant back so that I can shoot everything together.  Besides, this will give me time to make a few more new things!

I've been planning for some time to learn various methods of setting faceted stones.  I've only recently gotten to that happy place where I have both the appropriate tools and acceptable materials, but I have been making good progress!  Earlier this summer I started making and using tube settings, like the one in this ring:


This, sadly, is only a CZ, not a diamond!  I suppose eventually I will be able to afford very, very small diamonds, but I didn't want to practice on them!  People confuse "hardness" with "toughness."  Because diamonds are so hard, they are also extremely brittle, and are prone to cracking and chipping if not treated carefully!


Just this week I finally tried a flush setting, which is a way to set a stone into the surface of a piece of metal without prongs or extra "settings" around it.  It only works for fairly small stones, but I've discovered that it is incredibly easy!  This is a good thing, because small stones tend to be less expensive than big stones.  I've now found that I'll be able to accent pieces with small stones quite easily!  This is my test piece:


It's really tiny - 3/4" total length.  The stone is only 2mm, but it was really easy to set!  I was afraid such small stones would be very tricky and tedious, but so far flush settings are OK!  I'm not so sure about the earring design though.  I like them sitting on a table, but I don't like them so much as they look when worn.  They're a little too short.  I think if I were to try this design again I'd scale the whole thing up by about a third.

Now that I have some new techniques to play with I want to start branching out and using them a bit.  At least this means that when I place orders for stock I already have an idea of what I'm gong to use it for, and it doesn't end up sitting in my inventory for years waiting for the right idea to come along!  The current goal is to start to amass a small collection of faceted stones that have some color!  CZs are inexpensive and perfect to learn/practice with, but there just isn't enough color contrast for them to be noticed when they're set in silver.


My next project is to make an anti-tarnish storage roll for my finished pieces.  Everything is tarnishing way too quickly, and I have several pieces with soft stones that can't just be tossed into the tumbler!  I suspect this is because my space constraints force me to store everything in my basement, which is quite damp.  A storage/transport roll will take up considerably less space, and I'll be able to store everything upstairs!  When I've finished and worked all the kinks out of the plan, I'll post a tutorial.  Look for it to be up within the next two weeks!


Monday, September 14, 2009

Finished pendant!


Friday's pendant, with stones set!  Perhaps not one of my best photos (the silver really is a lot brighter than it looks), but I wanted to show at least some indication that the small stone is a garnet, and I didn't want to take the whole "studio" set up out just for a quick snapshot.  This is what I get with shooting on the table in the back yard.  No, it is not going to stay on the ribbon.  I have some Venetian Box chains arriving on Saturday, and I hope to be able to put it on one of them.

If you compare the final piece to the original sketch from Friday's blog post you can see where I deviated from my original plan.  I'd planned to do two 20ga wires with 30ga wire twined around them (sort of a figure-8 wrap) and have them go down the right side and curve around the bottom, but I decided that my twining skills weren't up to it yet, plus it would take too long.  I made little Argentium balls instead.  Also, when I made my original sketch I hadn't decided to put the 3mm garnet in yet.  I've decided that the whole thing reminds me of paisley patterns, so that's what I'm going to call it when I finally take good photos and post it in my shop.

Tomorrow- stamped post-hoops!

Saturday, September 12, 2009

What I'm working on


So far, despite losing three days of production time doing other, practical things - this has been a productive week for me!  I was able to get a lot of work done in just the two days I had free, and that wasn't even all the available time!  I'm really feeling good about my ability to sink my teeth into this and get some really creative work done.  So far I have been able to complete the onyx earrings pictured above (these are about 1/2" long), make several pairs of fairly simple sterling hoops, and four pairs of two new  styles of sterling studs.


these are maybe 1/4" in diameter


These are maybe 3/16" to 1/2" in diameter

The earrings are nice, but they're really pretty simple, design-wise.  Simple can be good - lots of people want simple, and I'm happy to provide simple, classic, goes-with-anything jewelry to people who want it.  This is the bread-and-butter stuff.  Not too difficult, not too expensive, not very time-consuming, with wide-appeal.  I sell a lot more of this basic style of jewelry than I do the really complex original jewelry, probably because it's a lot less expensive.  People can walk away with a $15 pair of earrings and feel like they got something special because it was handmade, and they didn't have to break the bank to do it.  Pieces like my Underwater Vision necklace definitely draw their attention, but whoever this piece goes home with will need to have a more specific taste in jewelry, and much deeper pockets than the average shopper!

Having time during the day with Scarlett at school is giving me time to design more of the complex pieces in addition to the simpler pieces.  Here's one I'm working on now:


my sketch around the focal stone - it was in with a pile of rutilated quartz, but things on that table were a little messed up, and it looks more like tourmaline in quartz to me.


removing excess metal from in back of the stone 


filing... 


adding the first bit of embellishment... 


...and that's as far as I got while the camera was still in the room!  I was able to finish all of the metal fabrication on Friday, so on Monday it should just be final polishing and setting the stones!  I'll post more pictures when it's finished.

Saturday, September 5, 2009

On Perfectionism


I'm a bit of a perfectionist.  You know that axiom that says “anything worth doing is worth doing well”?  I have a corollary that says “anything that can't be done well isn't worth doing.”  Unfortunately, my subconscious seems to think that “well” is interchangeable with “right” and “perfectly.”  This tends to mean that any time I come across something I think would be fun to try, I research the heck out of it.  I want to make sure I have the best idea possible of what I am doing before I get started.  After all, why reinvent the wheel?  Why not give myself the best possible chance at success on the first go?  This strategy has served me well, but it also means that if I feel I don't have a skill or piece of equipment (or  the right temperament) for a given project, I'll put it off – sometimes indefinitely- until I have what I think I need to “do it right.”  I'm starting to get the feeling that this attitude is stifling my productivity and possibly even my creativity.  I need to start working on identifying when being  “perfect” really matters and when it doesn't.  Sometimes I wonder what I might be missing out on. 

Perfectionism in my jewelry is generally a good thing.  Because I sell my work, I don't want to put anything out for sale that is sub-standard – according to my standards.  This means no lumps of solder on visible seams, no scratches on pieces that are meant to be highly polished, and the back of the piece is as neat as the front.  By my standards, scratches on the back are not excusable simple because they won't be visible while the piece is being worn.  They are visible to me, and to anyone who picks the piece up and looks at it. 

I have my standards with photography as well.  I grew up with professional photographers in my family.  I've studied the subject in college, I've taught it at the High School level, and I spent about 15 years working as a printer in the photofinishing industry.  I have ingrained perfectionist habits as a result of all that time working with other people's pictures.  I have an excellent idea of What Doesn't Work!  I also seem to believe that I need to take all my photos in professional RAW format and adjust each of them individually in Photoshop.  The unfortunate drawback to this otherwise excellent standard is that most of my casual photos and family snapshots sit on my hard drive and never get seen by anyone except me.  Even if I skipped the image adjustment, I'd still have to convert them from RAW files to JPEGs before I could post them online or email them to family.  Do I really need to take all my family snapshots using the most professional file format my camera can produce? No, I don't.  Nor do I need to put that much effort into casual snapshots of what I'm working on for my blog.  It makes sense to use a professional format when I'm doing product photos for my online shops at 1000 Markets and Etsy, and for photos that I'm going to use for gifts or holidays cards. For snapshots where the only purpose is to give people a glimpse into my life I think it's overkill. 

When I want to show the world what I'm doing I need to take my audience into consideration, as well as my standards, and try to filter out the opportunities for overkill.  This applies to blog posts as well.  This post isn't being graded, nor am I getting paid for it.  I don't need to forward it to everyone I know who writes for a living for an opinion before I post it.  If I don't allow some things to sometimes be less than perfect  I'll never get around to doing anything.

Monday, August 31, 2009

And yet another blog goes live ....

I finally started posting in my 1000 Markets Blog.  You can read today's post here.  The photo of the sugilite does not do it justice - the reflection of the sky prevents you from seeing what it really looks like.

Sunday, August 30, 2009

Artist's Statement finished!

After several brief bursts of typing interspersed with long periods of procrastination, I have finally finished my Artist's Statement!  I've posted it at the DaisyCat Jewelry blog.  Even if I don't get around to cleaning off the kitchen table today, at least I've accomplished this!

Saturday, August 29, 2009

Lovely weather we're having here!

From a week of temps in the 90's to a week of rain and the 70's!  My tomatoes are going to be very confused :(  I'm trying to rescue as many from blight/blossom-end-rot as I can.  The cucumbers are a bust this year.  On the other hand, the eggplants and pole beans are doing brilliantly!


Only a few more days til school starts and I can get back in the studio and really get some work done!  I figure I'll give myself about two weeks of production time, then I'll spend a day taking pictures of everything.  I hate these all-day shoots, but I really need more than one photo of certain items.  I also want the props in my earring photos to match, so this gives me the chance to re-shoot all of them at the same time.  We'll see if it makes a difference!

Friday, August 28, 2009

They tell me this will be good for me...

...so I've gone ahead and done it.  Of course I'm doing it 15 minutes before my daughter goes to bed, with the cat on my keyboard, so this will necessarily be short.  Photos will have to wait until later.

I needed to think of a name for my blog - I realized this fits my life perfectly!
Related Posts with Thumbnails